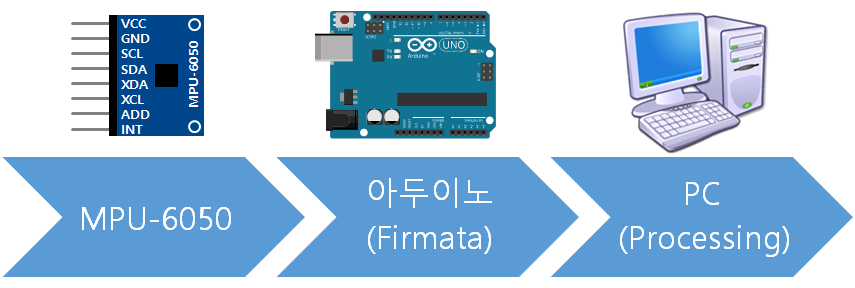
MPU-6050 가속도 센서
MPU-6050은 x, y, z축의 자이로스코프 기울기와 가속도를 측정할 수 있는 센서입니다. 이 센서를 이용하면, 드론 및 3차원 탑승장치의 기울어짐이나 운동 상태를 모니터링 할 수 있습니다.
이 센서는 I2C 통신을 사용하여 데이터를 송수신합니다. 아두이노에 기본적으로 내장된 Wire 라이브러리가 I2C 통신을 지원하기 때문에 별다른 라이브러리를 따로 설치할 필요가 없습니다.
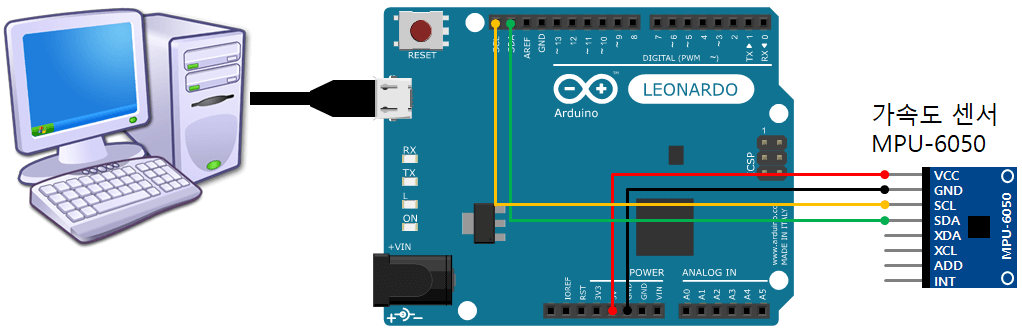
MPU-6050 연결
센서와 아두이노의 SDA, SCL 단자를 서로 연결합니다.
아두이노 소스 설치 및 작동 테스트
- 아두이노에 아래의 소스 코드를 업로드합니다.
/* GY-521 자이로&가속도 센서 (MPU-6050) 예제입니다. UNO R3 : http://kit128.com/goods/view?no=71 GY-521 자이로&가속도 센서 (MPU-6050) 모듈 : http://kit128.com/goods/view?no=146 출처: http://whiteat.com/Arduino */ #include const int MPU = 0x68; // I2C address of the MPU-6050 int16_t AcX, AcY, AcZ, Tmp, GyX, GyY, GyZ; // 프로그램 시작 - 초기화 작업 void setup() { Serial.begin(9600); // 시리얼 통신 초기화 Serial.println("Arduino Examples - GY-521 Gyro& Accelator (MPU-6050) Module"); Serial.println(" http://docs.whiteat.com/?p=2662"); Wire.begin(); Wire.beginTransmission(MPU); Wire.write(0x6B); // PWR_MGMT_1 register Wire.write(0); // set to zero (wakes up the MPU-6050) Wire.endTransmission(true); // gyro scale Wire.beginTransmission(MPU); Wire.write(0x1B); // Wire.write(0xF8); // Wire.endTransmission(true); // acc scale Wire.beginTransmission(MPU); Wire.write(0x1C); // Wire.write(0xF8); // Wire.endTransmission(true); } void loop() { Wire.beginTransmission(MPU); Wire.write(0x3B); // starting with register 0x3B (ACCEL_XOUT_H) Wire.endTransmission(false); Wire.requestFrom(MPU, 14, true); // request a total of 14 registers AcX = Wire.read() << 8 | Wire.read(); // 0x3B (ACCEL_XOUT_H) & 0x3C (ACCEL_XOUT_L) AcY = Wire.read() << 8 | Wire.read(); // 0x3D (ACCEL_YOUT_H) & 0x3E (ACCEL_YOUT_L) AcZ = Wire.read() << 8 | Wire.read(); // 0x3F (ACCEL_ZOUT_H) & 0x40 (ACCEL_ZOUT_L) Tmp = Wire.read() << 8 | Wire.read(); // 0x41 (TEMP_OUT_H) & 0x42 (TEMP_OUT_L) GyX = Wire.read() << 8 | Wire.read(); // 0x43 (GYRO_XOUT_H) & 0x44 (GYRO_XOUT_L) GyY = Wire.read() << 8 | Wire.read(); // 0x45 (GYRO_YOUT_H) & 0x46 (GYRO_YOUT_L) GyZ = Wire.read() << 8 | Wire.read(); // 0x47 (GYRO_ZOUT_H) & 0x48 (GYRO_ZOUT_L) /* Serial.print("AcX = "); Serial.print(AcX); Serial.print(" | AcY = "); Serial.print(AcY); Serial.print(" | AcZ = "); Serial.print(AcZ); Serial.print(" | Tmp = "); Serial.print(Tmp / 340.00 + 36.53); //equation for temperature in degrees C from datasheet Serial.print(" | GyX = "); Serial.print(GyX); Serial.print(" | GyY = "); Serial.print(GyY); Serial.print(" | GyZ = "); Serial.println(GyZ); delay(333); */ int xAxis = (AcX - 1090); int yAxis = (AcY - 930); int zAxis = (AcZ - 1000); Serial.print(xAxis); Serial.print(" "); Serial.print(yAxis); Serial.print(" "); Serial.print(zAxis); Serial.println(" "); delay(50); } - 소스 코드를 업로드한 다음 시리얼 모니터를 열어보면, x, y, x 축 기울어짐 값이 출력되는 것을 볼 수 있습니다.
- 여기까지가 성공하였으면 아두이노 보드는 PC와 연결한 채로 둔다음, 아두이노 소프트웨어만 닫습니다. 이제 아두이노 보드가 전송하는 데이터를 다른 프로그램에서 받아서 처리하게 할 것입니다.
프로세싱 설치 및 게임 작동
- 아두이노에서 전송하는 기울기 데이터를 받아서 처리하는 게임 프로그램을 만들어 보겠습니다. https://processing.org/download/에 접속하여 프로세싱을 다운로드 받습니다.(processing-x.x.x.zip 파일 형태) 이미 설치되어 있다면 다운로드 단계는 생략합니다.
- 다운받은 zip 파일을 적당한 폴더에 압축을 풀어 놓습니다.
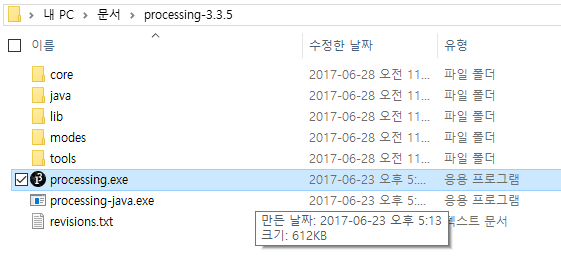
- processing.exe 파일을 실행시킵니다.
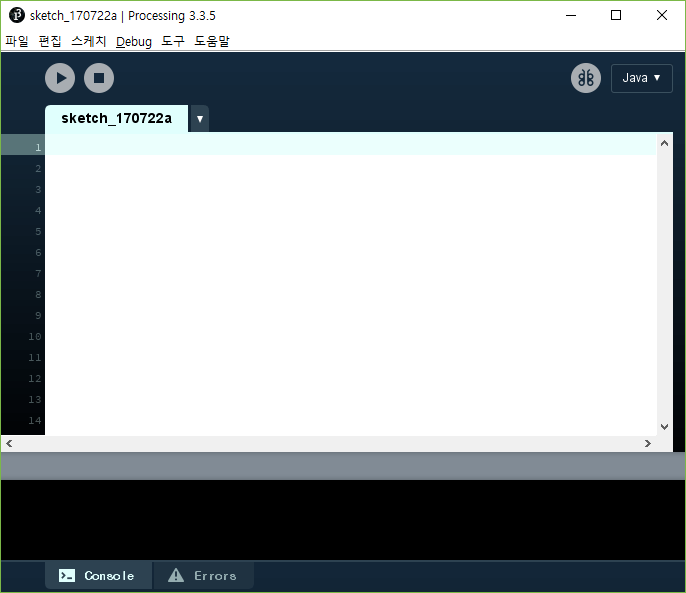
- 프로세싱에 아래의 소스 코드를 붙여넣습니다.
import processing.serial.*; Serial myPort; float xRot = 0; float yRot = 0; int hWall = 30; int wall[][] = { {-400, -400, 800, 0}, {-400, -400, 0, 800}, {-400, -200, 100, 0}, {-300, -300, 0, 100}, {-300, -300, 100, 0}, {-200, -300, 0, 100}, {-100, -300, 0, 200}, {0, -300, 0, 100}, {100, -300, 0, 400}, {100, -300, 100, 0}, {300, -300, 0, 200}, {300, -300, 100, 0}, {0, -200, 100, 0}, {200, -200, 100, 0}, {400, -400, 0, 800}, {-300, -100, 200, 0}, {100, -100, 100, 0}, {-300, -100, 0, 200}, {-200, -100, 0, 100}, {0, -100, 0, 100}, {0, 0, 100, 0}, {-100, 0, 0, 100}, {200, 0, 0, 100}, {300, 0, 0, 100}, {-400, 100, 100, 0}, {-100, 100, 400, 0}, {-200, 100, 0, 200}, {-300, 100, 100, 0}, {200, 200, 200, 0}, {-300, 200, 0, 200}, {-100, 200, 0, 100}, {0, 200, 0, 200}, {100, 200, 0, 100}, {-200, 300, 100, 0}, {100, 300, 300, 0}, {-400, 400, 700, 0} }; float xBall = 50; float yBall = -350; float vxBall = 0; float vyBall = 0; void setup() { frameRate(40); size(1400, 800, P3D); //포트 검색 후 시리얼통신 실행 println("Available serial ports:"); println(Serial.list()); myPort = new Serial(this, Serial.list()[0], 9600); setup2(); } void setup2() { xBall = 50; yBall = -350; vxBall = 0; vyBall = 0; } void draw() { background(255); float fov = PI/10.0; float cameraZ = (height/2.0) / tan(fov/2.0); perspective(fov, float(width)/float(height), cameraZ/2.0, cameraZ*2.0); camera(width/2, height/2, cameraZ, width/2, height/2, 0, 0, 1, 0); lights(); translate(width/2, height/2); rotateX(1.0); pushMatrix(); int nBuffer = 0; while (myPort.available() > 0) { String inBuffer = myPort.readString(); String subBuffer[] = { "", "", ""}; int max = 0; int len = inBuffer.length(); for (int i = 0; i < len; i++) { if (inBuffer.charAt(i) == ' ') { max++; if (max >= 3) break; } else subBuffer[max] = subBuffer[max] + inBuffer.charAt(i); } if (max != 3) break; int x = -int(subBuffer[1]); if (x > 0) x = max(x - 4, 0); if (x < 0) x = min(x + 4, 0); xRot = x/8000.0; xRot = constrain(xRot, -PI/7, PI/7); int y = -int(subBuffer[0]); if (y > 0) y = max(y - 4, 0); if (y < 0) y = min(y + 4, 0); yRot = y/8000.0; yRot = constrain(yRot, -PI/7, PI/7); } noFill(); stroke(0, 255, 0); { pushMatrix(); translate(0, 0, 0); box(1024, 1024, 1); popMatrix(); } rotateX(xRot); rotateY(yRot); fill(255); stroke(64); //바닥 { pushMatrix(); translate(0, 0, -1); box(800, 800, 1); popMatrix(); } //벽 for (int n = 0; n < wall.length; n++) { pushMatrix(); translate(wall[n][0] + wall[n][2]/2 - 2, wall[n][1] + wall[n][3]/2 - 2, hWall/2); box(wall[n][2] + 5, wall[n][3] + 5, hWall); popMatrix(); } vxBall += yRot * 5; vyBall -= xRot * 5; if (abs(vxBall) >= 20) vxBall = vxBall*20/abs(vxBall); if (abs(vyBall) >= 20) vyBall = vyBall*20/abs(vyBall); xBall += vxBall; yBall += vyBall; float tollerence = 23; for (int n = 0; n < wall.length; n++) { // horizontal Wall if (wall[n][2] > 0) if ((wall[n][0] - tollerence*0.9) < xBall && (wall[n][0] + wall[n][2] + tollerence*0.9) > xBall) { if (abs(wall[n][1] - yBall) < tollerence) { if (wall[n][1] < yBall) { yBall += 2; vyBall = 0; } else { yBall -= 2; vyBall = 0; } } } // vertical Wall if (wall[n][3] > 0) if ((wall[n][1] - tollerence*0.9) < yBall && (wall[n][1] + wall[n][3] + tollerence*0.9) > yBall) { if (abs(wall[n][0] - xBall) < tollerence) { if (wall[n][0] < xBall) { xBall += 2; vxBall = 0; } else { xBall -= 2; vxBall = 0; } } } } // 공 { fill(255, 0, 0); noStroke(); pushMatrix(); translate(xBall, yBall, 20); sphere(20); popMatrix(); } if (yBall > 420) setup2(); popMatrix(); } - 키보드 [Ctrl+R] 키를 눌러 프로세싱 프로그램을 실행시키면 미로게임이 실행됩니다.
- 프로세싱 코딩에 대해 잘 알고 있다면 화면을 좀 더 예쁘게 꾸며서 나만의 게임을 만들 수도 있습니다.
목차
- 아두이노 고급키트 무작정 따라하기
- 아두이노 8×8 LED Matrix
- 아두이노 Remote Control Test
- 아두이노 Stepper Speed Control
- 아두이노 RFID Reading Test
- 아두이노 LCD Test
- 아두이노 DHT11 온습도 센서 테스트
- 아두이노 3-Color LED Test
- 아두이노 4×4 Keypad Test
- 아두이노 DS1302 Realtime Clock Test
- 아두이노 시계
- 아두이노 초음파 센서 HC-SR04
- 아두이노 초음파 거리측정기
- 아두이노 LCD Test (I2C 모듈 사용)
- 아두이노 초음파 거리측정기 (I2C LCD 사용)
- 아두이노 LM35 온도계 (with Processing)
- 아두이노 미로게임 (MPU-6050 + 프로세싱)